A lot has been written about predator hunting, but what about the fur. What do you do with it. Do you sell it or have it mounted or tanned? How about making your own hat, any style you want. Its really not as hard as one may think. Making a hat out of a predator you fooled into thinking it was coming to a free dinner can be rewarding and another way of enjoying the hunt even more with a keepsake and a story.
If you’re thinking of making a fur hat for yourself this is for you. The following article with the pics and a little studying you’ll be able to make a fur hat fairly easy. First you’ll need a tanned pelt. You can have your hides tanned at various tanneries or a local taxidermist can have it sent out to get tanned for you. Normally it takes about one coyote or fox for a hat and getting one tanned varies by tanneries and taxidermists. Moyle mink and tannery out of Idaho is a reputable tannery and does a lot of tanning for trappers and hunters. If you don’t know how to prep a hide for shipping, you can contact them and they will give you instructions or you can take it to a taxidermist that can do it as well for a fee.

Now you need to determine what style of hat you want to make. I make 3 different styles basically. They are the Mountain Man with feet and legs on it or the easier one the Daniel Boone with just a tail, then there is the Trooper style with ear flaps and a front flap and a woman’s style that’s a basic hat with a rim of fur around it and a tail off the back, the pattern of which I got by taking apart a woman’s dept store fake fur hat and made a pattern out of it. You can basically make any type or style of hat you want just by using old hats and using them as a pattern, even a bonnet.
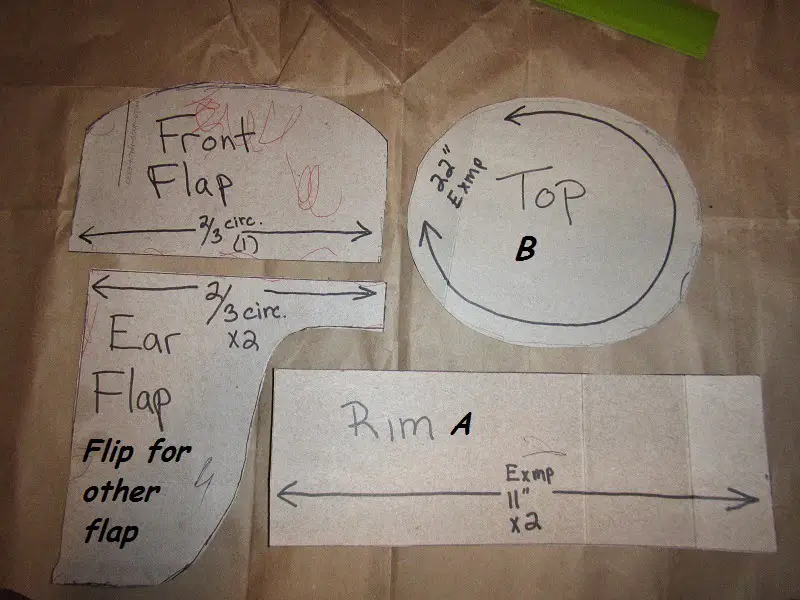
Once you decide what type of hat you want to make, its time to get some measurements. The first measurement is the circumference of your head, then a measurement from just above your eyebrow over your head to the base of your skull. This will give you a good fit and a starting point to laying out your pattern. Of course if you’re using an old hat that fits you as a pattern it isn’t necessary, you can just use the store bought hat as a pattern (fig 3, 3a,3b). Now back to measurements,the circumference measurement you divide by 2 which will give the width of your pattern for say a Mountain Man style hat (Fig. 1, 1a at the bottom of this article). So for ex. your measurement is 22” your pattern width would be 11” (see dia.) The other measurement would give you the length of your pattern, usually 15”-16”. With those measurements draw a rectangle on your grocery bag, that will be the pattern to lay on your pelt when you’re ready. For the trooper style or Daniel Boone style you basically would make two rectangles (A) 11” long and 3.5”- 4” wide, which would be the pattern for around the head and then a circle (B) with a circumference of 22” which would be the top (see Fig 4, 4a. at the bottom of this article)
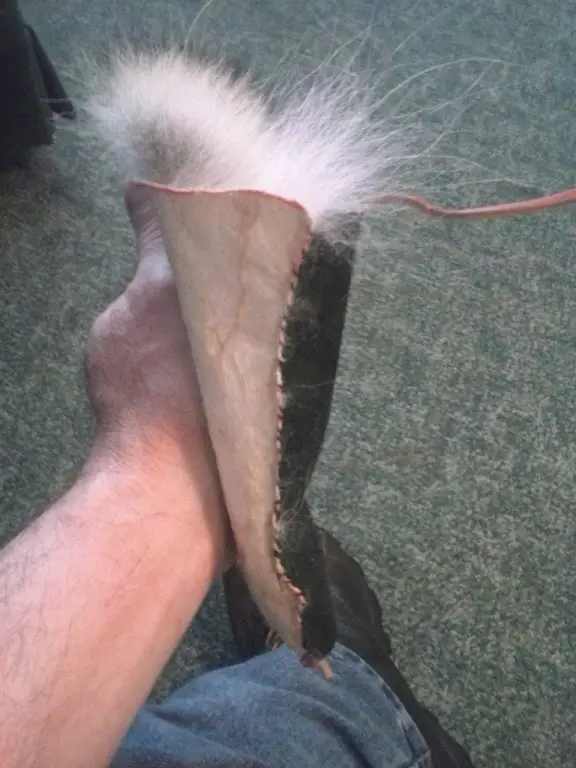
Once you have the style and pattern you want figured out and drawn out on the leather side of the pelt (note: when doing ear flaps, make sure you flip the pattern over to draw the other flap,or you’ll have two ear flaps for just one side) it’s time to cut the pieces out using the utility razor blades, just carefully cut on the lines you have drawn, taking your time.
Once your pieces are cut out, lay them out fur side up to see how the fur lays and arrange them to where they are going to go when sewn together. At this point you can mark on the leather side numbers or letters to correspond to which piece gets sewn to which piece, like A to A , B to B etc. Now its time to sew the pieces together. When I sew I basically use a loop stitch. I start by butting up the two pieces I want to sew at the moment up to each other. Then start on one end. When I sew, I sew so that it’s fur to fur and the leather side is on the outside. Basically sewing the hat with it inside out (Fig 5 and 3a at the bottom of this article) . This keeps the fur out of your way when sewing and also hides your stitching when your done with the final hat. The sewing is the most time consuming part. At the end of each stitch run when you need to tie off and start with new thread, dab a little fabric glue on the knots you tie off, it helps to keep them from coming undone over time if you’re not the best seamstress. After you have the hat sewn together, try it on before you make and sew in the liner. If it’s snug thats fine, the leather stretches and will fit like a glove in no time. If it seems loose, you can take it in a little by re-sewing the side seams by cutting the seam out with the razor on both sides of the stitching, then sewing up again, you shouldn’t have to do this if you measured right.
Once you have your pieces sewn together at the seams etc, your hat will basically be done as far as the fur part goes, it’ll just be inside out. Now is the time to flip it or turn it so it’s fur out. You should have a nice hat taking shape. What you want to do next is make the liner. For making the liner you just use the basic pattern you used for the hat and trace it out on your fabric and cut it out and sew it like you did the fur part. This will be a lot easier sewing for the most part. Once you have your liner made, it’s time to slip it inside the main hat and positioned so it sits inside evenly all around the edges etc. Once you have it positioned you can use a little fabric glue in a few spots and let dry to hold it in place, then sew the liner in all around the edge where the liner and leather meet to seal it up. If you want the face of the animal on your hat you can basically cut the face from the pelt just behind the ears and tack sew it to the front of your hat. There’s many other ways to incorporate the head into the hat with this way being the simplest and easiest for a first timer.
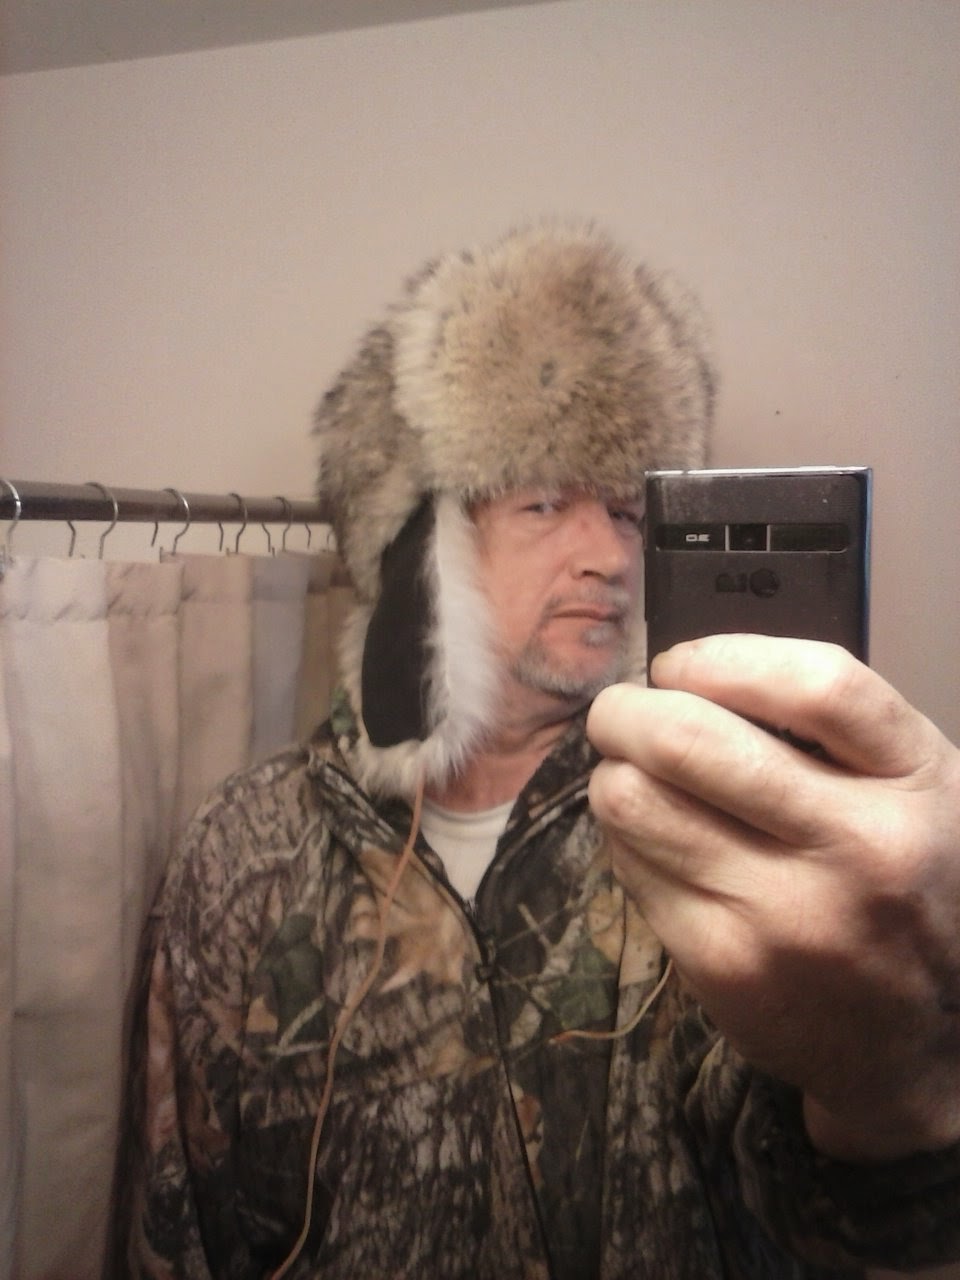
By now you should have yourself a hat you made yourself from a critter you harvested yourself. Hopefully these pics and writing will help you accomplish making you’re own hat. Don’t be afraid to try your own ideas, whats wrote here is just the basics on how to go about it. Good luck and have fun.